Minggu, 19 Juni 2016

Websploit

Websploit is a tool to do many things, from attacking, sniffing, an others even though the module is not really as many as metasploits. This is what websploit looks like.

Websploit

From the display, it is similar like metasploit. Let's take a look for the modules.
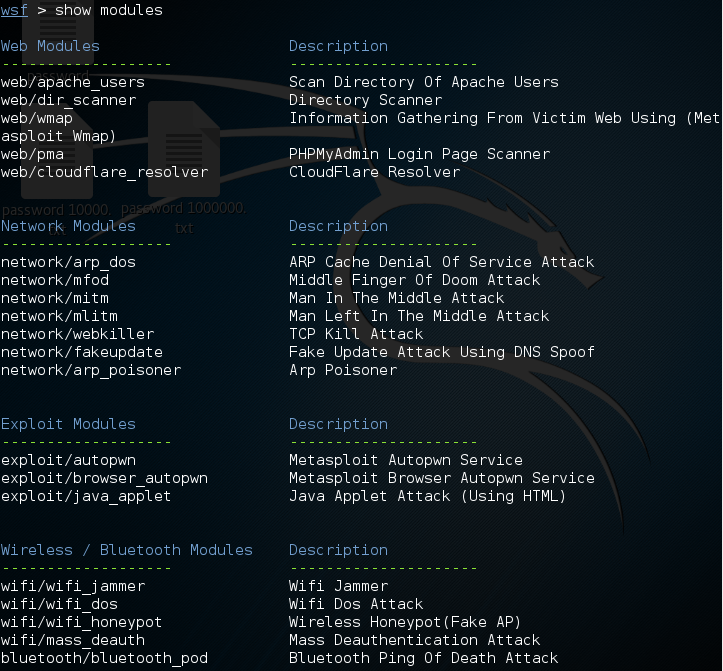
Websploit modules

As you can see, websploit divides into 4 modules and it is very few compare to metasploit. For now, i only use network/mitm (Man In The Middle attack). Basically to describe Man-In-The-Middle attack, it is like the source communicate with the target, but the third person comes and eavesdropping the conversation without knowing there is a third person for the source and the target (knowing as "Intercept").

Let's back to the topic, so i choose network/mitm and to know what to do next, enter "show options".

network/mitm

Before i continue, i choose my win 2000 as the target machine and the ip address is 192.168.59.129.

win 2000

Using "show options", you can see the interface, router, target, sniffer and ssl. There are 4 types sniffer but this time i choose urlsnarf.

To start the tools, enter "run".

Back to my win 2000, now i open my Opera and i go to 9gag.com.

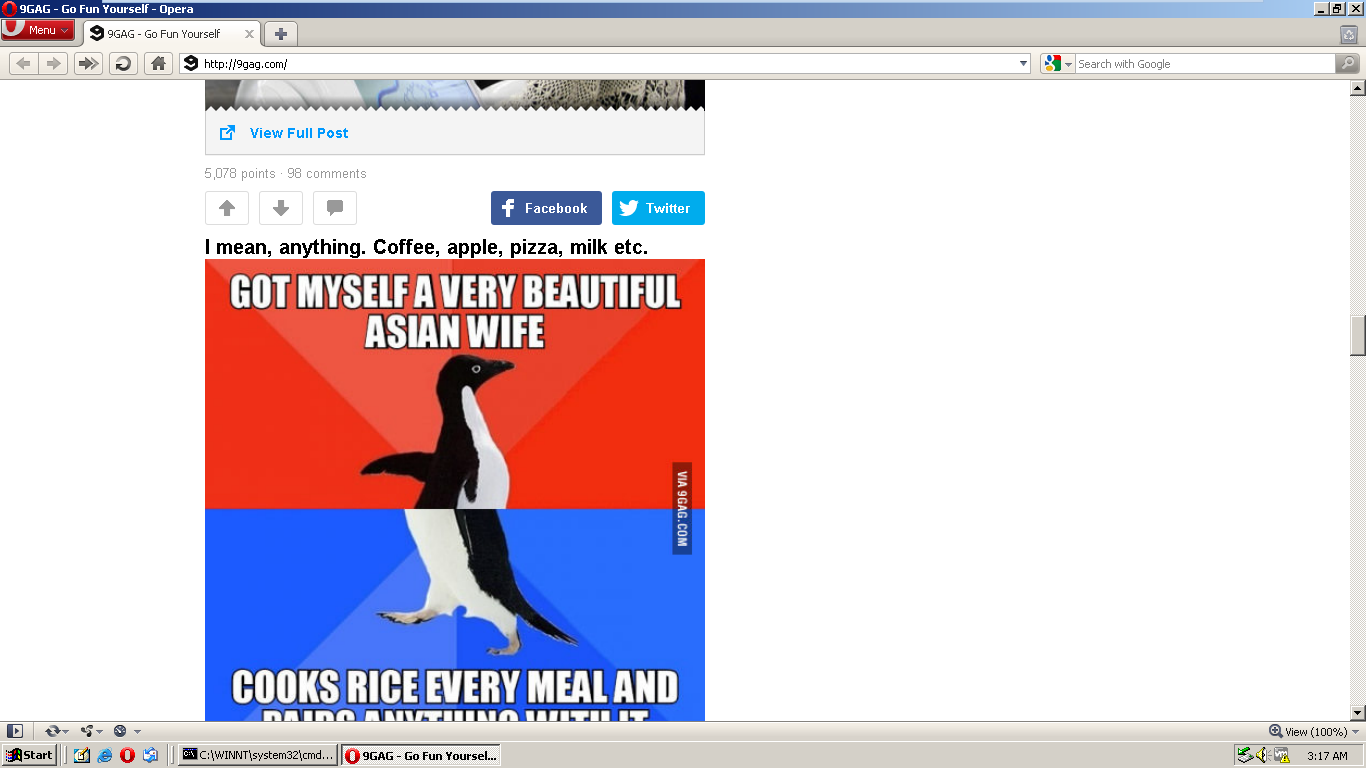
9gag.com in Opera using win 2000

Now back to my Kali Linux and see what is change.

We can see now there is some change in here. From that data, we can know that the target is using Opera 9.80 Presto 2.6.30 version 10.63, open 9gag website and using OS windows. Let's try another website and this time i use detik.com.
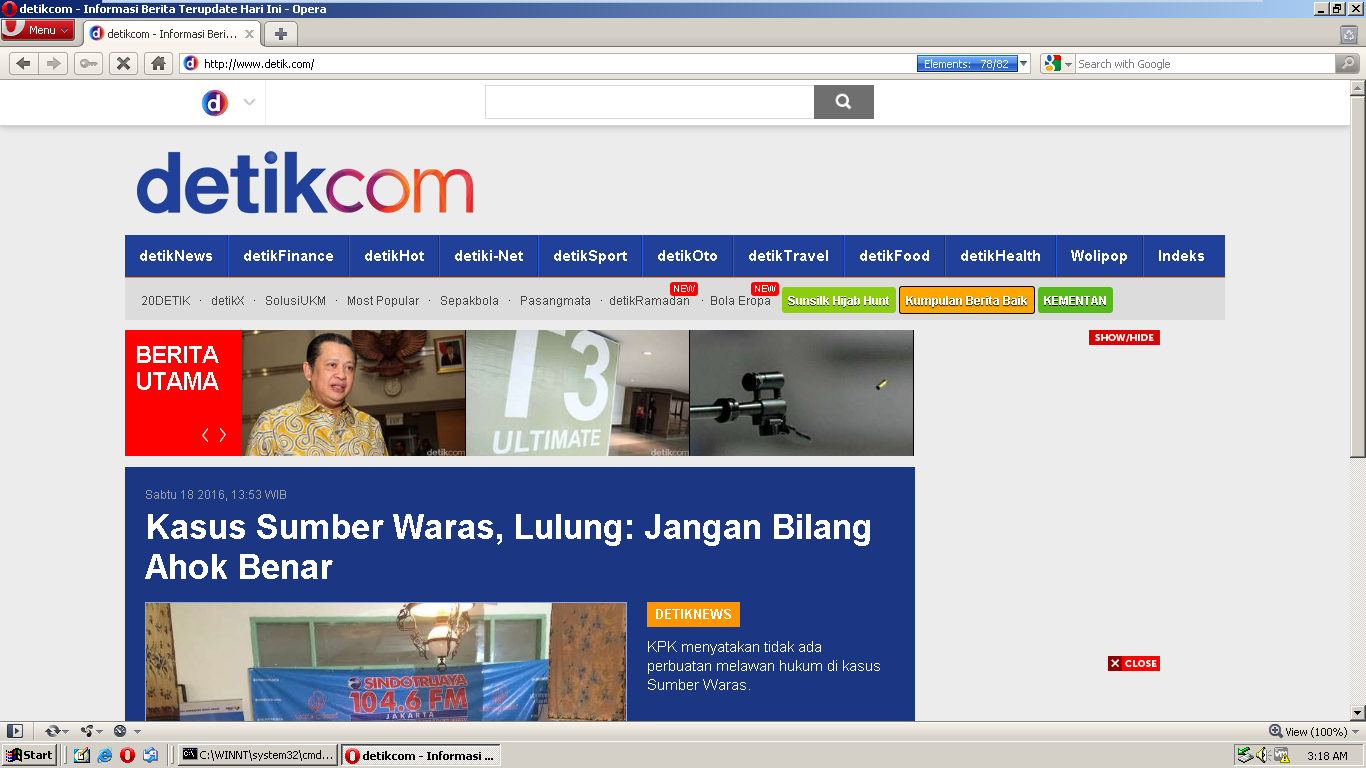
detik.com

Then go back again and see what happen.


So this time there are so many information and because of that i only capture 2 pictures. Because we are using same OS, most of the previous information is same except the site, which is detik.com.

Now let's do other thing using network/webkiller.


For the target, i use vacationet.com.


vacationet.com

As usual, show options and change the target.

Last, we start to attack.

When i try to visit the web again, nothings happen. I assume because i don't have enough computer to attack the target.


target still alive

So that's some websploit modules and remember to use it wisely.

Reference:
http://tools.kali.org/web-applications/websploit

Kamis, 16 Juni 2016

HTTRACK

httrack is a tool to copy the website to your computer and from there you can search any information offline, like for example search any critical data that useful for attacking or for social engineering.

Let's go to the kali linux and click application > 03 - Web Application Analysis > httrack.


When you run them, it is looks like this.


To get more information, i use "--help" and i capture the common options to use.


The syntax to use httrack is httrack <URLs> [-option] [URL_FILTER].
For the website, i use http://www.webscantest.com/ for the test and this is the result. Remember if the website is contain lots of data or information, the process will goes longer.

 httrack webscantest.com


Some files and folders from webscantest.com

Because i put the destination file in root, this is the result (not tidy). First, i want to check the log file.


From the result, i get 53 errors and 48 warnings. Then i check the cookies.


Here i get 2 cookies for NB_SRVID and TEST_SESSIONID. Then i check the webscantest.com folder.


Because there are so many of them, i only choose some to be shown. First, i open 2 index.html (from that directory and xmldb directory) and this is the result.

home page

index.html from xmldb folder

Notice that the URL is different from the original one. Last one, i want to check only one of any folder that is written in leafpad, but when i try to open one, there is nothing because of the errors and warnings that i get before.

The conclusion is using httrack, we actually can get any critical information from the target website as long it is not get lost of errors and warnings message for log file.

Reference:
http://null-byte.wonderhowto.com/how-to/hack-like-pro-clone-any-website-using-httrack-0152420/

Deep Web

You all know what is website and people usually use it anywhere and anytime. It all based from Internet. But did you know that anything that we explore is not 100%? Because there is another web that we not explore everyday and it is located deeper than our usual website. It is called "Deep Web". What we explore is called surface web and it is actually less than 10%!


Deep web or Dark Web is a network that is encrypted and usually use Tor if you want to open it. Generally it is used for any illegal activities, like drugs selling, hire hitman and so on. But before that, remember to open it with your risk and always use Tor to hide your identity or you will be trouble.

Why use Tor? Because Tor allow user to publish website without reveal their location. Also if you notice they website usually use encrypted link.

The Hidden Wiki

From that picture, we cannot know what is the name of the website from the link until we see more detail like above and guess it and Tor can access it with .onion in the end.

It is very important when we explore deep web. Using normal browser will end up to lose some of your account, money, exposed and get virus and so many bad things will happen to you. So if you want to explore deep web, explore it with your own risk and do not do anything that ridiculous.

Reference:

Ransomware

Ransomware is a type of malware that has unique things. It will encrypt our data and we cannot access it unless the user pay the ransom to get the data into original again. But, by paying the ransom doesn't guarantee that we will get the data back, it's depend from the attacker. If the ransom attack the system's hard drive, it will be very hard or impossible to decrypt it.

This is what the file looks like when the user attacked by ransomware.

.cerber (Ransomware)

.crypt (Ransomware)

There are 2 types of ransomware: encrypting and non-encrypting. 

Encrypting ransomware starts in 1989 and known as "AIDS" Trojan at that time. The attack is similar like nowadays, encrypt the data and need to pay some money in order to receive back the data. But, the first one use a license reason to attack by saying the licence is expired. The malware still going on and evolve until now. One of the well known ransomware attack is CryptoLocker, 

CryptoLocker

The way CryptoLocker attack is from email attachment and usually targeting Windows user. When the user click that malicious attachment, the malware will encrypt the file and show a message that if the user want to decrypt the data, they must do the payment using bitcoin or voucher in limited time. If they cannot do it, the key for decrypt will be deleted by the attacker and the file cannot be recover anymore.

Non-encrypting ransomware starts in 2010 and at that time it known as WinLock. From the type of attack, we know that the attack did not encryp the data, it restrict access to the system and show pornographic stuff. To get the access to the system again, they must send a SMS that cost more than normal price to get the decrypt key.

WinLock

Nowadays, the ransomware evolve into one of the most dangerous malware and luckily, we actually can recover some type of ransomware attack,like HitmanPro.Alert, BitDefender Anti Crypto Vaccine and Anti-Ransomware and so on. 

It is not really hard to prevent it, but sometimes human can make mistake and not suspicious enough for any suspicious things like email attachment that looks promising but actually contain some malware and so on.

To prevent your data from ransomware, always back up your data frequently. So if one day your pc get attacked by ransomware, you already have the back up data and no need to worry about the data that already encrypted. Also use some software to recover any data from ransomware even though it only works for some type of ransomware.

Reference:


Minggu, 15 Mei 2016

Unicornscan and Comparison with nmap

Unicornscan is another port scanner tools and it works similar to nmap. Let's take a look.


The syntax for unicornscan is: unicornscan [option] [target host]. First, i use unicornscan to my laptop as the target (192.168.1.100) and this is what i got.


To ensure what i get is same, i use nmap and compare the result.


From the result, there is some difference between nmap and unicornscan. nmap is show more complete result rather than unicornscan (not as complete as nmap) and for nmap, there are one filtered port shown and unicornscan didn't. 

For next one i will use TCP scan and this is the result.


And i compare it with nmap too.


The result still same like the previous example so next i will use UDP scan for next example.

Using UDP scan, this is the result for unicornscan.


Using -v (verbose) will show all the ports that will be scanned, network interface and some info and time. The result shows 2 UDP open ports and some error message. From what i get, it is defunc, means it is not supported anymore.

Now i will compare it using nmap -v -sU (UDP scan) and this is the result.


For nmap, using -v not shows the list of scanned port and from the result, there is a different. unicornscan get 2 open ports (69 and 137) while nmap only 1 open port (137). 

We also can use some specified port to be scanned, for the example, i use TCP scan for port 21,25,80,100,443 and this is the result.


Another option that i use is sniff (--sniff). For the last, i will do sniff to my laptop as the target.


Using sniff we can get the packet information like window size, packet length, checksum and others.

In conclusion, i can say that nmap is better choice for port scanning. unicornscan actually can be better but there is no update after 2007 until now. For the speed, unicornscan is faster than nmap because based from UDP scan, nmap takes about 11 seconds and unicornscan takes about 7 seconds or more.

For port scanning, always make sure to use more than one tool because from my result unicornscan UDP scan gives complete result than nmap.

Reference:
https://www.aldeid.com/wiki/Unicornscan
https://thewhitecathacker.wordpress.com/2014/05/09/nmap-vs-unicornscan/
https://sourceforge.net/p/osace/mailman/message/27025022/(the error message)

Sabtu, 16 April 2016

Wireshark

Wireshark is a free and open source packet analyzer and used for network troubleshooting, analysis, software and communications protocol development, and education. It is used to see what happen to the packet that we send and receive to and from the target host.

To open the wireshark, turn on your Kali Linux and go to application > 09 - Sniffing and Spoofing > Wireshark.


When you open your Wireshark, it will look like this.

Wireshark

It will show error message but just click ok to continue. There are eth0, any,Loopback: lo, bluetooth0, nflog, nfqueue, usbmon1 and usbmon2. To see the packet info, double click on eth0 (because my connection is on eth0) and it will show like this.


If you want it to run, you must do internet communication thing, like browsing, using terminal or other. For my example, i use terminal and do ping detik.com.

ping detik.com

The result become like this.

Result ping detik.com in wireshark

Now wireshark fills with information of your packet sends to detik.com. If you want to stop the capture, press the stop button.

button for stop capturing packets

Now it's done capturing packet and you can see some information there. One of the example is ICMP info that says "echo (ping) request" means we send packet to the host.

For another example, i use nmap to my laptop as the target.


And the result in wireshark is like this.


You can see there are some red lines and there is "[RST]" means we cancel our communication. But for second picture, there are lots of [RST, ACK]. It means the port is close. For the example, i choose this one.


From this one, it says 22 -> 54295 [RST, ACK] means it sends the RST, ACK packet back to me because the port is closed. If you not sure about that, see again list of my open port below when i use nmap to target my laptop.

Here i give you a video to learn more about wireshark (windows version)


Reference:

Download: